We’re getting close to the end here, only 3 more commands. Let’s start by reading the “Summary” and “Usage” docs for this command.
“Summary” and “Usage” docs
# Summary: List installed Ruby versions
# Usage: rbenv versions [--bare] [--skip-aliases]
#
# Lists all Ruby versions found in `$RBENV_ROOT/versions/*'.
This command lists all the Ruby versions that you’ve installed via RBENV.
$ rbenv versions

  system
* 2.7.5 (set by /Users/myusername/Workspace/OpenSource/impostorsguides.github.io/.ruby-version)
  3.0.0
It takes two optional flags:
--bare--skip-aliases
I try each one in my terminal to see what the output will be:
$ rbenv versions --bare

2.7.5
3.0.0
Looks like --bare leaves out the system version, as well as the origin for the currently-selected version of Ruby.
$ rbenv versions --skip-aliases

  system
* 2.7.5 (set by /Users/myusername/Workspace/OpenSource/impostorsguides.github.io/.ruby-version)
  3.0.0
The --skip-aliases flag had no effect here. That’s because I don’t have any aliases for my Ruby versions. I can create one to demonstrate how this works:
$ cd ~/.rbenv/versions

$ ln -s 2.7.5 foobar

$ ls -la

total 0
drwxr-xr-x   5 myusername  staff  160 Jun 23 11:17 .
drwxr-xr-x  19 myusername  staff  608 Jun 23 11:13 ..
drwxr-xr-x   7 myusername  staff  224 May 30 13:34 2.7.5
drwxr-xr-x   7 myusername  staff  224 Jun  5 09:46 3.0.0
lrwxr-xr-x   1 myusername  staff    5 Jun 23 11:17 foobar -> 2.7.5

$ rbenv local foobar

$ rbenv local

foobar
Now I have an alias to my 2.7.5 version, named foobar. When I run rbenv versions, I see:
$ rbenv versions

  system
  2.7.5
  3.0.0
* foobar (set by /Users/myusername/.rbenv/versions/.ruby-version)
But if I run rbenv versions --skip-aliases, I see:
$ rbenv versions --skip-aliases

  system
  2.7.5
  3.0.0
We’re now only seeing canonical Ruby versions, and have left out any aliases.
Why might someone want an alias for a Ruby version? If someone has a lot of Ruby versions installed and can’t remember which is the right version for a certain project, it can be helpful to alias the correct version with a name that will help them remember this information.
If a developer decides to do that, they will want the ability to print out both the Ruby versions with any aliases, and the canonical Ruby versions without those aliases.
Let’s move on to the tests.
Tests
After the bats shebang and the loading of test_helper, the first block of code is:
Creating a fake Ruby version, for testing purposes
create_version() {
  mkdir -p "${RBENV_ROOT}/versions/$1"
}
This helper function creates a version sub-directory inside RBENV’s versions/ directory.
Setting up our tests
Next block of code:
setup() {
  mkdir -p "$RBENV_TEST_DIR"
  cd "$RBENV_TEST_DIR"
}
This helper function creates and navigates into RBENV’s test directory.
Stubbing out the system Ruby version
Next block of code:
stub_system_ruby() {
  local stub="${RBENV_TEST_DIR}/bin/ruby"
  mkdir -p "$(dirname "$stub")"
  touch "$stub" && chmod +x "$stub"
}
This helper function makes a fake version of the system Ruby file in our test directory, in an executable file named “stub” located inside a directory named bin/ruby.
Because our test_helper modifies $PATH to include RBENV_TEST_DIR before the real system Ruby installation, this stubbed Ruby version is the version that RBENV will encounter when searching for system Ruby.
When we only have system Ruby installed
First test:
@test "no versions installed" {
  stub_system_ruby
  assert [ ! -d "${RBENV_ROOT}/versions" ]
  run rbenv-versions
  assert_success "* system"
}
This test does the following:
- It sets up a fake installation of system Ruby.
- As a sanity check, it asserts that RBENV’s “versions/” folder does not exist (to indicate that there are no Ruby versions installed via RBENV).
- It then runs the
versionscommand. - Lastly, it asserts that the user’s system Ruby installation is indicated in the printed output.
The “*” symbol is used to indicate which is the currently-selected Ruby version, if more than one version is installed.
When no Rubies are installed at all
Next test:
@test "not even system ruby available" {
  PATH="$(path_without ruby)" run rbenv-versions
  assert_failure
  assert_output "Warning: no Ruby detected on the system"
}
- This test removes the
rubyexecutable from$PATH, via thepath_without rubycommand from BATS. - It then runs the
versionscommand. - It asserts that:
- the command fails because there’s no Ruby version installed (not even “system” Ruby), and that
- an error message to that effect is printed to STDOUT.
When the --bare flag is passed
Next test:
@test "bare output no versions installed" {
  assert [ ! -d "${RBENV_ROOT}/versions" ]
  run rbenv-versions --bare
  assert_success ""
}
- As a sanity check step, this test asserts that no Ruby versions have been registered with RBENV.
- It then runs the
versionscommand with the–bareflag. - Lastly,l it asserts that the command was successful but that nothing was printed to STDOUT.
We’ll see later that the versions command automatically prints out system when the --bare flag is not passed. So one of the jobs of --bare must be to strip out the system Ruby from the list of installed Ruby versions.
With a single Ruby version and without a --bare flag
Next test:
@test "single version installed" {
  stub_system_ruby
  create_version "1.9"
  run rbenv-versions
  assert_success
  assert_output <<OUT
* system
  1.9
OUT
}
- We stub the
systemRuby to ensure it exists. - We also create an installed version (
v1.9) that RBENV will recognize as being different from thesystemRuby. - We then run the command and assert that:
- it completed successfully, and
- that the output printed to
STDOUTincludes both the system and non-system versions that we added during the test setup.
Here, system has an asterisk in front of it, indicating that RBENV thinks this is the currently-installed version.
With a single version and with a --bare flag
Next test:
@test "single version bare" {
  create_version "1.9"
  run rbenv-versions --bare
  assert_success "1.9"
}
This test is similar to the previous one featuring the --bare flag, except this time we create an installed Ruby version in the setup phase. We then run the versions –bare command and assert that this Ruby version is the only thing printed to STDOUT.
When multiple versions are installed
Next test:
@test "multiple versions" {
  stub_system_ruby
  create_version "1.8.7"
  create_version "1.9.3-p13"
  create_version "1.9.3-p2"
  create_version "2.2.10"
  create_version "2.2.3"
  create_version "2.2.3-pre.2"
  run rbenv-versions
  assert_success
  assert_output <<OUT
* system
  1.8.7
  1.9.3-p2
  1.9.3-p13
  2.2.3-pre.2
  2.2.3
  2.2.10
OUT
}
- We create both the
systemRuby and 6 other Ruby versions. - We then run the
versionscommand and assert that:- it was successful, and
- that all 6 Ruby versions as well as the “system” Ruby are printed to STDOUT.
Since we didn’t specify either a global or local Ruby version, the expected STDOUT output includes an asterisk next to system to indicate that this is the Ruby version currently in-use.
When a non-system version is selected
Next test:
@test "indicates current version" {
  stub_system_ruby
  create_version "1.9.3"
  create_version "2.0.0"
  RBENV_VERSION=1.9.3 run rbenv-versions
  assert_success
  assert_output <<OUT
  system
* 1.9.3 (set by RBENV_VERSION environment variable)
  2.0.0
OUT
}
- Here we create the “system” Ruby version and 2 additional versions.
- We then run the
versionscommand, passing in the first version we created as the value for theRBENV_VERSIONenv var. - We assert that:
- the command was successful,
- the “system” version and the 2 additional versions all appear in the printed output,
- the version set by the env var is indicated as the currently-selected Ruby version, and
- that the source of the Ruby version selection was an environment variable.
The selected version is not indicated when --bare is passed
Next test:
@test "bare doesn't indicate current version" {
  create_version "1.9.3"
  create_version "2.0.0"
  RBENV_VERSION=1.9.3 run rbenv-versions --bare
  assert_success
  assert_output <<OUT
1.9.3
2.0.0
OUT
}
- Here we create two Ruby versions- “1.9.3” and “2.0.0”.
- We then run the command, passing both the
--bareflag and1.9.3as the value forRBENV_VERSION. - We assert that the command was successful.
- We also assert that the output is missing the
*symbol to denote the selected version.
Remember from the previous test that the value of RBENV_VERSION determines the version of Ruby that rbenv version thinks is currently in-use. However, we’re passing the --bare flag in this test, so we expect the asterisk character to be stripped out of the printed output. And that’s exactly what the 2nd assertion states- we expect both Ruby versions to be printed, but no asterisk next to “1.9.3”.
Also note that system is not mentioned in the expected output. As we discovered in a previous test, system will not be printed to STDOUT when the --bare flag is passed, which means it won’t be printed to the screen. That’s also the reason we don’t need to bother stubbing it.
When a global Ruby version exists
Next test:
@test "globally selected version" {
  stub_system_ruby
  create_version "1.9.3"
  create_version "2.0.0"
  cat > "${RBENV_ROOT}/version" <<<"1.9.3"
  run rbenv-versions
  assert_success
  assert_output <<OUT
  system
* 1.9.3 (set by ${RBENV_ROOT}/version)
  2.0.0
OUT
}
- Here we stub out “system” Ruby as well as create two installed Ruby versions- “1.9.3” and “2.0.0”.
- We also create RBENV’s global Ruby version file, and set its contents equal to the first of the 2 versions we created.
- We then run the command without any flags, and assert that:
- it was successful,
- the printed output includes both of our installed Ruby versions,
- the selected version is the one mentioned in the global version file, and
- the source of the selected version is RBENV’s global version file
When a .ruby-version file exists
Next test:
@test "per-project version" {
  stub_system_ruby
  create_version "1.9.3"
  create_version "2.0.0"
  cat > ".ruby-version" <<<"1.9.3"
  run rbenv-versions
  assert_success
  assert_output <<OUT
  system
* 1.9.3 (set by ${RBENV_TEST_DIR}/.ruby-version)
  2.0.0
OUT
}
- We stub the “system” Ruby and create two fake Ruby installations- one for v1.9.3 and one for v2.0.0.
- We then create a local Ruby version file and set its contents equal to v1.9.3.
- We run the command and assert that:
- The command was successful,
- The two installed Ruby versions and the system Ruby are included in the printed output
- v1.9.3 is selected as the version in-use, and
- The local version file is listed as the source of the selection preference.
When random files exist in the versions/ directory
Next test:
@test "ignores non-directories under versions" {
  create_version "1.9"
  touch "${RBENV_ROOT}/versions/hello"

  run rbenv-versions --bare
  assert_success "1.9"
}
- This test creates Ruby v1.9, and also creates a file named
helloinside RBENV’sversions/directory. - It then runs
versionswith the--bareflag. - Lastly, it asserts that only v1.9 is printed to STDOUT.
This test was added as part of this PR, as part of covering some edge cases for the --bare flag.
When aliases exist and the --bare flag is passed
Next test:
@test "lists symlinks under versions" {
  create_version "1.8.7"
  ln -s "1.8.7" "${RBENV_ROOT}/versions/1.8"

  run rbenv-versions --bare
  assert_success
  assert_output <<OUT
1.8
1.8.7
OUT
}
Here we create both an installed Ruby version (“1.8.7”) and a symlink to that version in the same “versions/” directory. We then run the versions command with the --bare flag, and assert that:
- The command was successful, and
- The printed output lists the canonical and symlink versions separately
So --bare includes aliases, but (as we saw with the previous test) not regular files.
When aliases exist and --skip-aliases is passed
Last test:
@test "doesn't list symlink aliases when --skip-aliases" {
  create_version "1.8.7"
  ln -s "1.8.7" "${RBENV_ROOT}/versions/1.8"
  mkdir moo
  ln -s "${PWD}/moo" "${RBENV_ROOT}/versions/1.9"

  run rbenv-versions --bare --skip-aliases
  assert_success

  assert_output <<OUT
1.8.7
1.9
OUT
}
- We create an installed Ruby version
1.8.7and an alias, as in the last test. - Then we create a directory named
moo/, this time inside our current directory. - We then create an alias for
moo/insideversions/, called1.9. - We call the
versionscommand, passing both the--bareflag and a ``skip-aliases` flag. - Lastly, we assert that:
- The command is successful,
- The output includes the alias to
moo/(because it’s not a duplicate of any other version that is located insideversions/). - The output does not include the
1.8alias (because we already printed the canonical1.8.7version which is located insideversions/).
That’s all the tests. Now on to the code:
Code
First block:
set -e
[ -n "$RBENV_DEBUG" ] && set -x
No surprises here:
set -eto tell the shell to exit immediately upon encountering an errorset -xto tell the shell to print to STDOUT in verbose mode, in this case only whenRBENV_DEBUGis set.
Handling arguments
Next block of code:
unset bare
unset skip_aliases

# Provide rbenv completions
for arg; do
  case "$arg" in
  --complete )
    echo --bare
    echo --skip-aliases
    exit ;;
  --bare ) bare=1 ;;
  --skip-aliases ) skip_aliases=1 ;;
  * )
    rbenv-help --usage versions >&2
    exit 1
    ;;
  esac
done
First we explicitly unset any variables named bare or skip_aliases. We’re still at the beginning of the file and haven’t had a chance to set these yet, so the only other way these could have been set is if they were passed in at execution time, i.e.:
$ bare=true skip_aliases=true rbenv versions
After we unset these two variables, we iterate over each argument in $@ (i.e. the list of args that was passed to the command). For each arg, we check the following:
- If the arg is equal to
--complete, we echo--bareand--skip-aliases. Then we exit. - If the arg is equal to
--bare, we set the variablebareequal to1. - If the arg is equal to
--skip-aliases, we set the variableskip_aliasesequal to1. - If the arg has any other value, we run
rbenv-helpfor theversionscommand, print the output tostderr, and exit with a non-zero return code.
Locating the directory that we will search for Ruby versions
Next block of code:
versions_dir="${RBENV_ROOT}/versions"
Here we just declare a variable named versions_dir, and set it equal to RBENV’s versions/ directory.
(Possibly) overriding the realpath utility to be more performant
Next block of code:
if ! enable -f "${BASH_SOURCE%/*}"/rbenv-realpath.dylib realpath 2>/dev/null; then
  if [ -n "$RBENV_NATIVE_EXT" ]; then
    echo "rbenv: failed to load \`realpath' builtin" >&2
    exit 1
  fi

  READLINK=$(type -p greadlink readlink 2>/dev/null | head -n1)
  if [ -z "$READLINK" ]; then
    echo "rbenv: cannot find readlink - are you missing GNU coreutils?" >&2
    exit 1
  fi

  resolve_link() {
    $READLINK "$1"
  }

  realpath() {
    local cwd="$PWD"
    local path="$1"
    local name

    while [ -n "$path" ]; do
      name="${path##*/}"
      [ "$name" = "$path" ] || cd "${path%/*}"
      path="$(resolve_link "$name" || true)"
    done

    echo "${PWD}/$name"
    cd "$cwd"
  }
fi
This is a really long block of code, but we’ve seen this exact same logic before, in rbenv-hooks:
-
We check whether we’re able to replace the
realpathsystem command with an identically-named (but faster, more performant) command which comes from the filerbenv-realpath.dylib. -
If we’re not able to do this, we check whether the user has specified that they want to build native extensions by setting the
RBENV_NATIVE_EXTenv var. If the user has done this, that means we can’t continue, so we print an error and exit with a non-zero return code. -
Otherwise, we attempt to replace the existing
realpathimplementation manually, by defining a new version of the command directly in therbenv-versionsfile.
Since we’ve already examined this logic in detail in a previous section, we’ll make do with this abbreviated explanation, and move on.
Ensuring our versions/ directory exists and is canonical
Next block of code:
if [ -d "$versions_dir" ]; then
  versions_dir="$(realpath "$versions_dir")"
fi
Here we check whether the string in the versions_dir variable we just created corresponds to an existing directory on our machine. If it does, we pass the string to the realpath command to eliminate the possibility that the directory is an alias or a symlink to another directory. realpath will return the canonical version of the given directory.
Printing our bare Ruby versions
Next block of code:
list_versions() {
  shopt -s nullglob
  for path in "$versions_dir"/*; do
    if [ -d "$path" ]; then
      if [ -n "$skip_aliases" ] && [ -L "$path" ]; then
        target="$(realpath "$path")"
        [ "${target%/*}" != "$versions_dir" ] || continue
      fi
      echo "${path##*/}"
    fi
  done
  shopt -u nullglob
}
We declare a helper function called list_versions, which prints out a list of our Ruby versions.
-
First, it turns on the
nullgloboption, which we’ve seen before. In this case, it helps avoid errors if ourversions/directory is empty. -
Then, for each item inside our
versions/directory, we ensure the item is a directory. If it’s not, we skip it. -
Next we check whether the
skip_aliasesflag has been set and whether the current path is a symlink. If both of those things are true, we need to check whether the alias points to a directory inside ourversions/directory. If it does, and if--skip-aliasesis true, we want to leave thispathout of our results. -
To check this, we use our
realpathhelper function to turn the symlink into its canonical directory. We check whether the parent directory of the resolved target (${target%/*}) is different from the versions directory ($versions_dir). If they are the same, it means the symbolic link points within the versions directory. - If we’ve reached this far in the helper method, we know by now that:
$pathis a directory insideversions/, and$pathis not a symlink (or if it is, we don’t mind that it’s a symlink).
-
Therefore, we
echojust the last part of the directory, with everything up to the final “/” character trimmed off. For example, if the path is/Users/myusername/.rbenv/versions/2.7.5, then we just echo2.7.5. - As a final cleanup step, we turn off the
nullgloboption that we turned on at the start of the function.
Next block of code:
if [ -n "$bare" ]; then
  list_versions
  exit 0
fi
If the bare flag is turned on, we have all the information we need to print the requested output. We don’t need to worry about sorting the versions, determining which of our versions is the current version, etc. We simply call our list_versions function to print each version one-by-one, then exit.
Sorting our versions
Next block of code:
sort_versions() {
  sed 'h; s/[+-]/./g; s/.p\([[:digit:]]\)/.z.\1/; s/$/.z/; G; s/\n/ /' | \
    LC_ALL=C sort -t. -k 1,1 -k 2,2n -k 3,3n -k 4,4n -k 5,5n | awk '{print $2}'
}
Here we define another helper function, this time named sort_versions. Let’s piece together what this function does according to the commands that it uses: sed, sort, and awk.
Using sed to correctly format the version numbers
The first part of this is the sed command:
sed 'h; s/[+-]/./g; s/.p\([[:digit:]]\)/.z.\1/; s/$/.z/; G; s/\n/ /'
The above contains a series of sed commands, separated by semi-colons.
It’ll be more readable if we give each command its own line:
h;
s/[+-]/./g;
s/.p\([[:digit:]]\)/.z.\1/;
s/$/.z/;
G;
s/\n/ /'
Now all we need to do is look up each command’s meaning in the manual, one at a time. To do this, we’ll use the GNU.org manual on sed, which has a section on sed scripts.
1. Saving the current line into hold space
The first sed command is h;. When I look up this command in the commands summary, I see:
     h
          Replace the contents of the hold space with the contents of the pattern space.
Wondering what “hold space” and “pattern space” are? This StackOverflow answer tells us:
When sed reads a file line by line, the line that has been currently read is inserted into the pattern buffer (pattern space). Pattern buffer is like the temporary buffer, the scratchpad where the current information is stored. When you tell sed to print, it prints the pattern buffer.
Hold buffer / hold space is like a long-term storage, such that you can catch something, store it and reuse it later when sed is processing another line. You do not directly process the hold space, instead, you need to copy it or append to the pattern space if you want to do something with it.
Translation- for each line that sed encounters, it first puts that line in the “hold space”, or the place in memory that it uses to store things for later.
2. Replacing all + and - chars with .
Next sed command:
s/[+-]/./g;
Section 5.5 of the GNU sed manual (titled “Classes and Bracket Expressions”) says:
A bracket expression is a list of characters enclosed by
[and]. It matches any single character in that list; if the first character of the list is the caret^, then it matches any character not in the list. For example, the following command replaces the words ‘gray’ or ‘grey’ with ‘blue’:
sed 's/gr[ae]y/blue/'…
The s command can be followed by zero or more of the following flags:
g
Apply the replacement to all matches to the regexp, not just the first.
What that means for us is, sed will find all examples of a + or - character, and replace it with a . character.
Let’s test this with an experiment. We’ll run just this particular sed regex against a test file.
Experiment- search-and-replace with sed
I make a simple text file named bar and paste the following Ruby versions inside it:
2.1.0-preview1
2.0.0-p247
1.9.3-p448
1.8.7-p374
2.0.0-p195
1.9.3-p429
2.0.0	2013
1.9.3-p392
2.0.0-rc2
1.9.3-p385
1.9.3-p374
1.9.3-p362
1.9.3-p327
1.9.3-p286
1.8.7-p370
1.9.2-p320
1.9.3-p194
1.9.3-p125
1.9.3	2011
1.9.3-rc1
1.9.3-preview1
These Ruby versions were taken from the official Ruby release list. I figured this looked like a fairly exhaustive list of all the various formats that Ruby uses for its version numbers.
I then ran the following command in my Bash terminal:
$ sed 'h; s/[+-]/./g;' bar

2.1.0.preview1
2.0.0.p247
1.9.3.p448
1.8.7.p374
2.0.0.p195
1.9.3.p429
2.0.0	2013
1.9.3.p392
2.0.0.rc2
1.9.3.p385
1.9.3.p374
1.9.3.p362
1.9.3.p327
1.9.3.p286
1.8.7.p370
1.9.2.p320
1.9.3.p194
1.9.3.p125
1.9.3	2011
1.9.3.rc1
1.9.3.preview1
We can see that the “-“ characters in the original have been replaced by “.” characters in the output.
3. Handling the p character in version numbers
Next sed command is:
s/.p\([[:digit:]]\)/.z.\1/;
This is another search-and-replace command. To see what this does, we can tack this command onto our previously-run sed command, after the semi-colon:
$ sed 'h; s/[+-]/./g; s/.p\([[:digit:]]\)/.z.\1/;' bar

2.1.0.preview1
2.0.0.z.247
1.9.3.z.448
1.8.7.z.374
2.0.0.z.195
1.9.3.z.429
2.0.0	2013
1.9.3.z.392
2.0.0.rc2
1.9.3.z.385
1.9.3.z.374
1.9.3.z.362
1.9.3.z.327
1.9.3.z.286
1.8.7.z.370
1.9.2.z.320
1.9.3.z.194
1.9.3.z.125
1.9.3	2011
1.9.3.rc1
1.9.3.preview1
We can see that the first line of output (2.1.0.preview1) didn’t change, but the 2nd line changed from 2.0.0.p247 to 2.0.0.z.247. In other words, .p247 changed to .z.247.
The pattern s/.p\([[:digit:]]\)/.z.\1/; can be thought of as the following 4 things, separated by the forward-slash / character:
s, plus.p\([[:digit:]]\), plus.z.\1, plus;
Let’s break down what this pattern does:
skicks off the “search-and-replace” operation..p\([[:digit:]]\)- everything between this first/and the next/is the old pattern, which we will be replacing with the new pattern..pmeans that the pattern we’re replacing will start with.p\( ... \)- we declare a “sub-expression” to temporarily store the contents inside( ... ), so that we can refer back to the contents later.[[:digit:]]means that we match any digit using the[[:digit:]]syntax, which is a named bracket expression.
.z.\1- this is the new pattern that we’ll use to replace the old pattern..z.means our new pattern will begin with the literal characters.z.\1means “keep the contents of the sub-expression from our old pattern”. This is called a back-reference, because we’re referring back to our previous sub-expression.
;- the final;terminates thissedcommand.
So to summarize the line s/.p\([[:digit:]]\)/.z.\1/;:
- We look for a
.character plus apcharacter plus any digit. - If we find a match, we replace that match with “.z.”, followed by the same digit in the sub-expression.
4. Adding .z to the end, for sortability
Next sed command is s/$/.z/;. Another search-and-replace command. The $ sign represents the end of the input, again according to this link.
So we’re searching for the end of the input, and we’re replacing it with “.z”. Essentially we’re concatenating “.z” to the end of the input line. We can test that again, by running this command after our previous commands:
$ sed 'h; s/[+-]/./g; s/.p\([[:digit:]]\)/.z.\1/; s/$/.z/;' bar

2.1.0.preview1.z
2.0.0.z.247.z
1.9.3.z.448.z
1.8.7.z.374.z
2.0.0.z.195.z
1.9.3.z.429.z
2.0.0	2013.z
1.9.3.z.392.z
2.0.0.rc2.z
1.9.3.z.385.z
1.9.3.z.374.z
1.9.3.z.362.z
1.9.3.z.327.z
1.9.3.z.286.z
1.8.7.z.370.z
1.9.2.z.320.z
1.9.3.z.194.z
1.9.3.z.125.z
1.9.3	2011.z
1.9.3.rc1.z
1.9.3.preview1.z
Here we can see that every single line now has a “.z” at the end of it, which was not the case at the end of our previous experiment.
We’re using .z as a delimiter, which will help us later when we sort numerically by major, minor, patch, and pre-release numbers. For example, in v1.9.3-p456:
1is the major number9is the minor number3is the patch numberp456is the pre-release number
Let’s consider an example to demonstrate how the addition of .z helps in sorting version numbers. Suppose we have the following list of version numbers:
1.11
1.2.3
1.2.10
1.3
1.2.9
1.2.9.1
If we take the above numbers in their original order and run sort on them, we get:
$ cat baz | sort

1.11
1.2.10
1.2.3
1.2.9
1.2.9.1
1.3
That’s not the order we want. However, by adding .z to the end of each line using the sed command, the original list becomes:
1.11.z
1.2.3.z
1.2.10.z
1.3.z
1.2.9.z
1.2.9.1.z
Now, we perform a numeric sort using the sort command, taking into account the additional .z field:
$ cat baz | sort -t. -k 1,1 -k 2,2n -k 3,3n -k 4,4n -k 5,5n
This gives us the correct sorting order:
1.2.3.z
1.2.9.z
1.2.9.1.z
1.2.10.z
1.3.z
1.11.z
The .z is removed later, when we invoke the awk command.
5. Adding the hold space to the pattern space
Next sed command:
G;
From the “3.2 sed commands summary” section of the GNU sed docs, we see this command does the following:
G
Append a newline to the contents of the pattern space, and then append the contents of the hold space to that of the pattern space.
So we’re just appending a newline and the contents of the hold space to the end of the pattern space.
What does this look like in our case? I add G; to the end of the command I’ve been running, and get the following:
$ sed 'h; s/[+-]/./g; s/.p\([[:digit:]]\)/.z.\1/; s/$/.z/; G;' bar

2.1.0.preview1.z
2.1.0-preview1
2.0.0.z.247.z
2.0.0-p247
1.9.3.z.448.z
1.9.3-p448
1.8.7.z.374.z
1.8.7-p374
2.0.0.z.195.z
2.0.0-p195
1.9.3.z.429.z
1.9.3-p429
2.0.0	2013.z
2.0.0	2013
1.9.3.z.392.z
1.9.3-p392
2.0.0.rc2.z
2.0.0-rc2
1.9.3.z.385.z
1.9.3-p385
1.9.3.z.374.z
1.9.3-p374
1.9.3.z.362.z
1.9.3-p362
1.9.3.z.327.z
1.9.3-p327
1.9.3.z.286.z
1.9.3-p286
1.8.7.z.370.z
1.8.7-p370
1.9.2.z.320.z
1.9.2-p320
1.9.3.z.194.z
1.9.3-p194
1.9.3.z.125.z
1.9.3-p125
1.9.3	2011.z
1.9.3	2011
1.9.3.rc1.z
1.9.3-rc1
1.9.3.preview1.z
1.9.3-preview1
If we compare the above side-by-side with the previous screenshot, we see that each of the previous command’s entries is now followed by the the original string value of the Ruby version.
6. Replacing newlines with spaces, so the version numbers become sortable
Last sed command:
s/\n/ /
When we add this to our running list of sed commands and execute it in the terminal, we get:
$ sed 'h; s/[+-]/./g; s/.p\([[:digit:]]\)/.z.\1/; s/$/.z/; G; s/\n/ /;' bar

2.1.0.preview1.z 2.1.0-preview1
2.0.0.z.247.z 2.0.0-p247
1.9.3.z.448.z 1.9.3-p448
1.8.7.z.374.z 1.8.7-p374
2.0.0.z.195.z 2.0.0-p195
1.9.3.z.429.z 1.9.3-p429
2.0.0	2013.z 2.0.0	2013
1.9.3.z.392.z 1.9.3-p392
2.0.0.rc2.z 2.0.0-rc2
1.9.3.z.385.z 1.9.3-p385
1.9.3.z.374.z 1.9.3-p374
1.9.3.z.362.z 1.9.3-p362
1.9.3.z.327.z 1.9.3-p327
1.9.3.z.286.z 1.9.3-p286
1.8.7.z.370.z 1.8.7-p370
1.9.2.z.320.z 1.9.2-p320
1.9.3.z.194.z 1.9.3-p194
1.9.3.z.125.z 1.9.3-p125
1.9.3	2011.z 1.9.3	2011
1.9.3.rc1.z 1.9.3-rc1
1.9.3.preview1.z 1.9.3-preview1
What happened? We replaced all occurrences of \n (i.e. a newline) with ' ' (i.e. a space). For example, this:
1.9.3.rc1.z
1.9.3-rc1
…became this:
1.9.3.rc1.z 1.9.3-rc1
Now, instead of each modified version string being appended with its original version, the two strings are on the same line, separated by a space.
This means that the sortable part of the line, i.e. 1.9.3.rc1.z comes first (so that the entire line can be sorted ), while the part we actually care about (i.e. 1.9.3-rc1) comes last. From there, we can use awk to grab just the 2nd part of the line, and print that out. But we’ll talk about that logic later on.
Using sort to correctly sort our newly-formatted version numbers
OK, so sed has returned the following text:
2.1.0.preview1.z 2.1.0-preview1
2.0.0.z.247.z 2.0.0-p247
1.9.3.z.448.z 1.9.3-p448
1.8.7.z.374.z 1.8.7-p374
2.0.0.z.195.z 2.0.0-p195
1.9.3.z.429.z 1.9.3-p429
2.0.0	2013.z 2.0.0	2013
1.9.3.z.392.z 1.9.3-p392
2.0.0.rc2.z 2.0.0-rc2
1.9.3.z.385.z 1.9.3-p385
1.9.3.z.374.z 1.9.3-p374
1.9.3.z.362.z 1.9.3-p362
1.9.3.z.327.z 1.9.3-p327
1.9.3.z.286.z 1.9.3-p286
1.8.7.z.370.z 1.8.7-p370
1.9.2.z.320.z 1.9.2-p320
1.9.3.z.194.z 1.9.3-p194
1.9.3.z.125.z 1.9.3-p125
1.9.3	2011.z 1.9.3	2011
1.9.3.rc1.z 1.9.3-rc1
1.9.3.preview1.z 1.9.3-preview1
Now we pipe the above text to the following command:
LC_ALL=C sort -t. -k 1,1 -k 2,2n -k 3,3n -k 4,4n -k 5,5n
1. Standardizing the way we sort, via LC_ALL
The first bit of syntax that Google is:
LC_ALL=C
This StackOverflow post tells us the following about LC_ALL:
LC_ALLis the environment variable that overrides all the other localisation settings (except$LANGUAGEunder some circumstances).…
You generally run a command with LC_ALL=C to avoid the user’s settings to interfere with your script. For instance, if you want [a-z] to match the 26 ASCII characters from a to z, you have to set LC_ALL=C.
So we’re setting the localization settings equal to a standardized, computer-friendly configuration for the purposes of sorting.
2. Calling sort, and turning a single line into multiple fields
Next part of this command is:
sort -t.
According to the man page for sort:
DESCRIPTION
The
sortutility sorts text and binary files by lines.Comparisons are based on one or more sort keys extracted from each line of input…
By default, if keys are not given, sort uses entire lines for comparison.
So in order to sort by major / minor / patch / pre-release version numbers, we’ll need to:
- split a single line into multiple fields, and
- sort each line by comparing a field from one line with the same field from another line.
- specify one or more “sort keys”, to tell
sorthow to compare apples with apples.
When I look up the -t flag in the man page, I see:
-t char, –field-separator=char
Use
charas a field separator character.
So the -t flag is the way we accomplish our first goal of separating a line into fields. By passing the -t. flag, we’re saying we want to use the . character as our “field separator”. In this case, a line such as 1.9.3.z.374.z will be separated into fields 1, 9, 3, z, 374, and z.
Field 1 from row 1 would be compared with field 1 of row 2.
- If the two fields are different, then we’d use our collating rules from
LC_ALL=Cto determine which row to put first. - If they’re the same, then we’d move on to the next field from each row, comparing field 2 from rows 1 and 2 in the same manner. And so on and so forth.
3. Specifying our sort keys
The next bit of syntax is the -k flag, which appears to be repeated multiple times in this command:
-k 1,1
-k 2,2n
-k 3,3n
-k 4,4n
-k 5,5n
In the man entry for sort again, we find the following:
-k field1[,field2], –key=field1[,field2]
Define a restricted sort key that has the starting position
field1, and optional ending positionfield2of a key field. The-koption may be specified multiple times, in which case subsequent keys are compared when earlier keys compare equal…
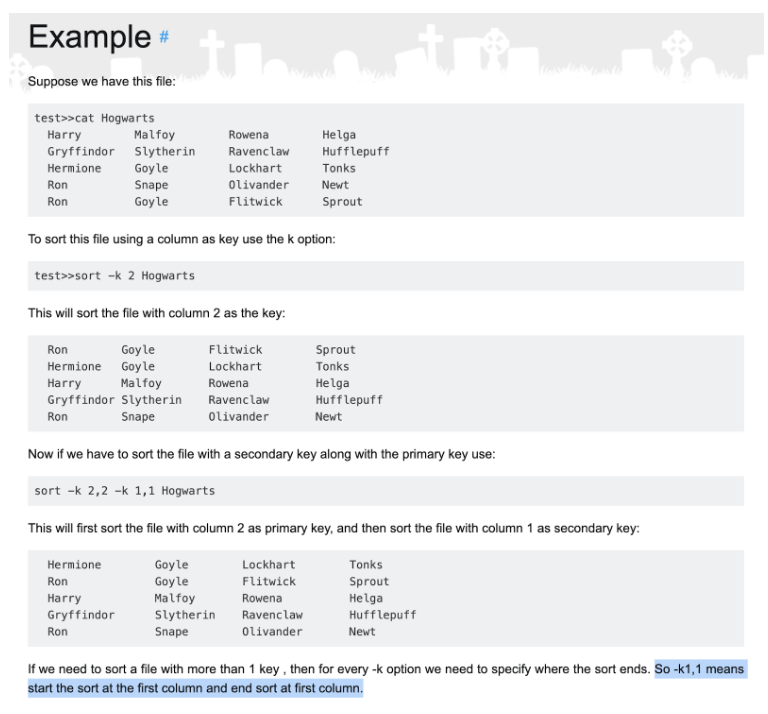
So we are using the -k flag multiple times in order to define multiple sort keys. The syntax 1,1 means “start the sort at the first field of each line, and end at the first field of each line.”
If we Google "bash sort keys", we get confirmation via this link, from a site called “RIP Tutorial”. I’ve highlighted the relevant sentence below:
Finally- the n character at the end of keys like -k 2,2n. I keep reading the man page, and I encounter the following:
-n, –numeric-sort, –sort=numeric
Sort fields numerically by arithmetic value. Fields are supposed to have optional blanks in the beginning, an optional minus sign, zero or more digits (including decimal point and possible thousand separators).
OK, so -k 2,2n just tells sort to use numerical (as opposed to lexicographical) sorting when comparing key / field 2.
Using awk to print the sorted version numbers
The last bit of code for the sort_versions helper method is:
| awk '{print $2}'
We pipe the output from the sort command into the awk command. awk takes in each line from our sorted list, splits the line into fields according to whitespace, and runs the command inside the curly braces on each line.
In this case, “the command inside the curly braces” is just printing the 2nd field (i.e. $2) of each line.
Remember, our input looks like this:
1.1.z 1.1
1.2.z 1.2
1.10.z 1.10
10.1.z 10.1
2.1.z 2.1
So a line like this:
1.1.z 1.1
Gets separated into two fields:
1.1.z, and1.1
Since the lines are already sorted in the correct order semantically, what we end up with is:
1.1
1.2
1.10
10.1
2.1
This is the output of sort_versions- a sorted list of versions!
Keen observers will notice that 10.1 comes before 2.1 in the above sorted list. That’s because -k 1,1 in our list of sort keys doesn’t have a n at the end. However, since we’re still a long ways away from Ruby v10.0.0, this isn’t a huge deal.
Storing RBENV’s list of Ruby versions
Next block of code:
versions="$(
  if RBENV_VERSION=system rbenv-which ruby >/dev/null 2>&1; then
    echo system
  fi
  list_versions | sort_versions
)"
The line RBENV_VERSION=system rbenv-which ruby checks whether the user’s machine has “system” Ruby installed. If it does, the command echos the string “system”.
Regardless of whether or not the system Ruby is installed, we then print a sorted list of all the non-system installed Ruby versions.
Sad path- if no Rubies are installed
Next block of code:
if [ -z "$versions" ]; then
  echo "Warning: no Ruby detected on the system" >&2
  exit 1
fi
If we were unsuccessful in fetching any Ruby versions, we print an error saying that we couldn’t detect any installed Ruby versions, and then exit with a non-zero return code.
Identifying the currently-selected Ruby version
Next block of code:
current_version="$(rbenv-version-name || true)"
Here we simply store the stringified, currently-selected Ruby version (in my case, 2.7.5) in a variable named current_version.
Printing each Ruby version, one-by-one
Last block of code:
while read -r version; do
  if [ "$version" == "$current_version" ]; then
    echo "* $(rbenv-version 2>/dev/null)"
  else
    echo "  $version"
  fi
done <<<"$versions"
Let’s break this up into two parts.
Piping our list of versions into the read command
while read -r version; do
  ...
done <<<"$versions"
We pipe the contents of versions into the read builtin shell command. The contents of versions looks something like this:
system
2.7.5
3.0.0
For each version, we store that line’s value in a local variable called version. Then we pass that local variable to the if block inside the while loop. When there are no more lines in versions, the while loop exits.
Formatting and printing each installed Ruby version
Part 2 of this code block:
  if [ "$version" == "$current_version" ]; then
    echo "* $(rbenv-version 2>/dev/null)"
  else
    echo "  $version"
  fi
If the value in our version variable is the same as the value we stored in current_version, we print the output of the rbenv version command, pre-pended by the asterisk symbol. We use rbenv-version instead of just the value of the version variable, because the former also tells us the origin file of the version too, not just the version number. For example, on my machine, rbenv version currently prints the following:
2.7.5 (set by /Users/myusername/.rbenv/version)
On the other hand, if this iteration’s version is not the same as current_version, we just print the version by itself with no extra info.
In summary, when I run rbenv versions on my machine, I get:
  system
* 2.7.5 (set by /Users/myusername/.rbenv/version)
  3.0.0
  3.1.0
That’s it for this file! On to the next one.